
The last couple of weeks, I have been working with Microsoft’s new service called Global Secure Access (GSA), which is positioned as a replacement for your traditional VPN, whether it be split tunnel or force tunnel. You can read more about it here – What is Global Secure Access?, as I won’t go into much detail about what it is in this blog post.
One of the features in GSA is Web Content Filtering. This is something you may be familiar with if you have worked with firewalls or with the web content filtering from Microsoft Defender for Endpoint. In Microsoft GSA, there is also the possibility to set up web content filtering. As you may or may not know, web content filtering enables you to block certain websites that fall into specific categories like gambling, adult content, social media, etc. There can be different reasons to why you want to block certain websites from different categories, such as protecting against data exfiltration or preventing users from gambling.
In this blog post, I want to share with you how I have set up user self-service so that users can request exceptions to certain categories without the need to contact IT, and the ability to permanently exclude certain user groups from being blocked from accessing certain websites. One good example is the Marketing department, which needs permanent access to social media sites, while the rest of the company should not be able to access social media sites. However, there may be situations where one or more users need the ability to access social media websites. Instead of contacting IT and having them create a temporary exception and then follow up with users when the exception can be closed again, users can request it for a brief period and have their manager (or another person) approve it. This way, users can quickly access what they need and get on with their work, and IT can focus on something else.
The self-service setup is based on using access packages created in Entra ID Governance. The way this is done is by creating an access package for each web content category that we want to allow exceptions for. Each access package contains a security group that is used in a Conditional Access policy that allows the traffic from the GSA client to that specific web content.
Pre-requisites
- Microsoft GSA enabled in the tenant.
- Internet Access traffic forwarding enabled.
- Knowledge about creating Conditional Access policies.
Permissions needed:
- Global Secure Access Administrator (To create Web content filter policies)
- Conditional Access Administrator (To create Conditional Access policies)
- Identity Governance Administrator (To create access packages)
- User Administrator (To create groups for the access packages)
Creating the Security and Web Content Filtering Policies
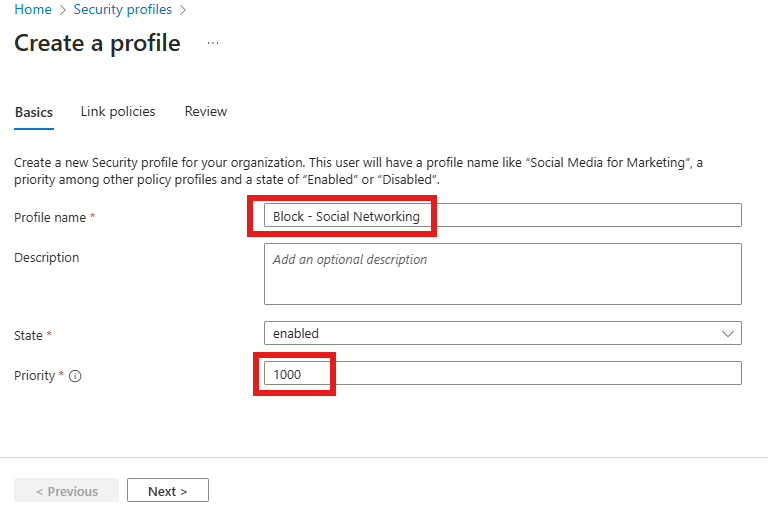
We’ll begin by creating the Allow policy for accessing Social Networks through a Security profile. These Security profiles will be used later in the Conditional Access policy. Essentially, a Security profile is an object that filters traffic for users, whether to “allow” or “block” it. One of the great features of GSA is that it integrates the web traffic filter you probably know from your firewall into Conditional Access. There’s also a process logic to these security profiles based on numbers between 100 and 65,000. This is crucial because if you’ve created multiple Conditional Access (CA) policies and users match on, say, two of them, the priority of the Security profiles comes into play. The security profiles will be processed from the lowest to the highest number (priority). Start by navigating to: https://entra.microsoft.com/#view/Microsoft_Azure_Network_Access/FilteringPolicyProfiles.ReactViews and select “Create Profile.” Add a name for the profile and priority.
Name: Allow – Social Networking
Priority: 1000
Then press Next.
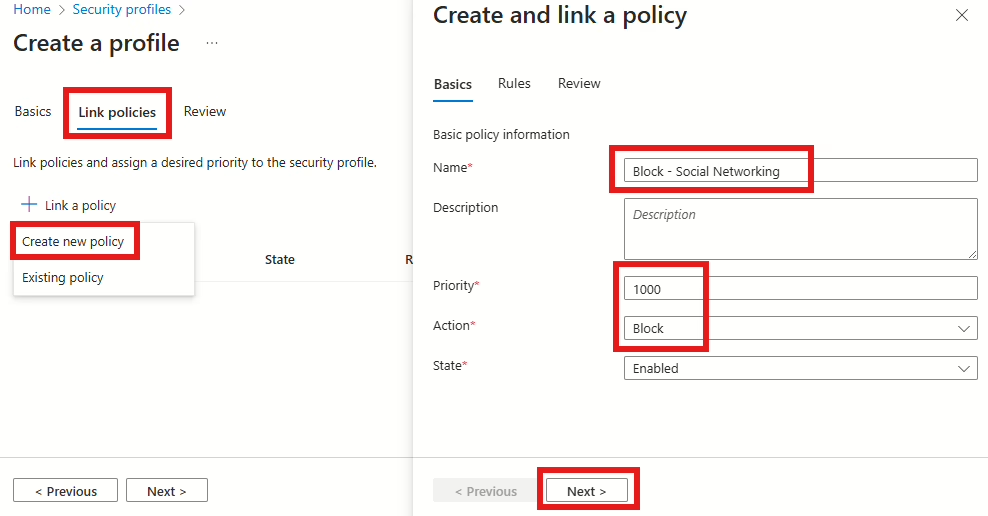
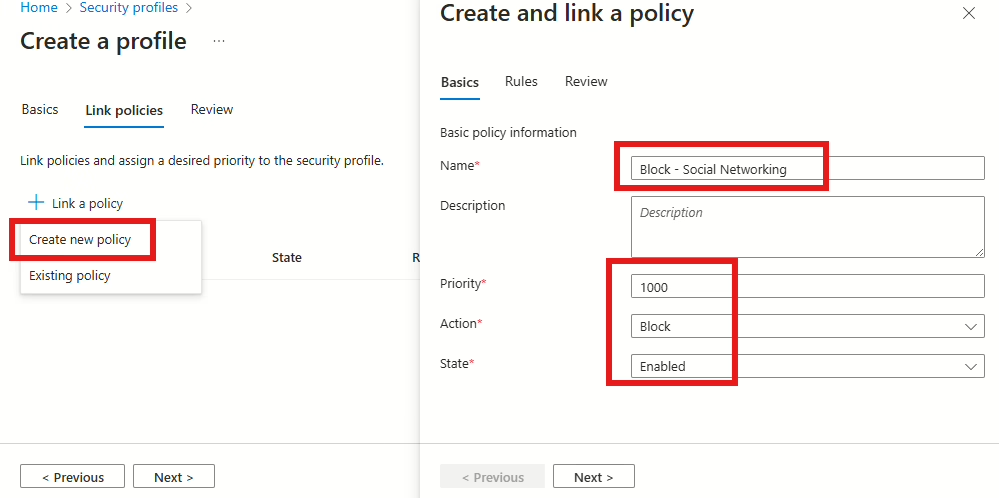
In the next window we are going create the Web content filtering policy. Click on Link policy and select Create new policy. Provide the Policy with a name and a priority – I’ll recommend using the same name and priority from the first step.
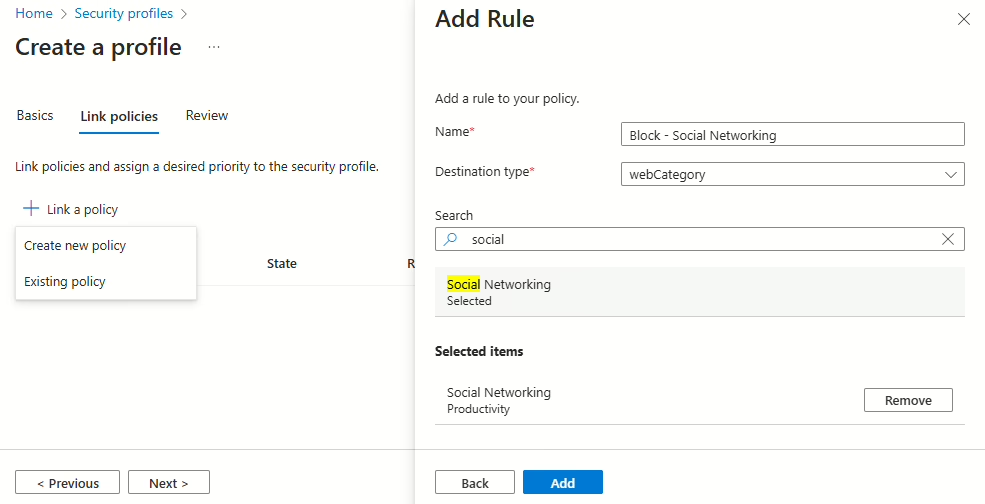
Now we need to add a rule. This is where we will be adding the block for the web content category
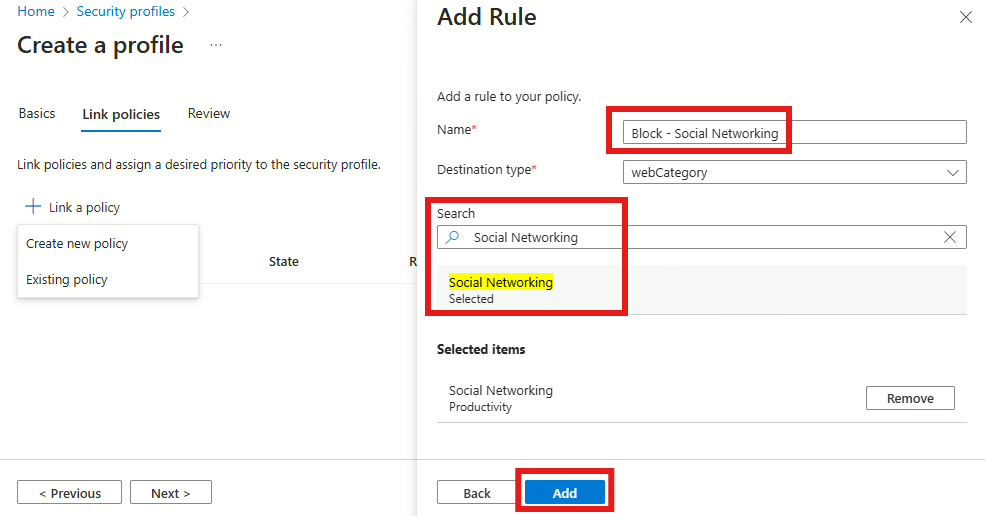
When the rule has been added, select Next, and then Create Policy.
The policy should now be showing under Link policies. If so, then press Next. You should then be presented with a review that should look like this:
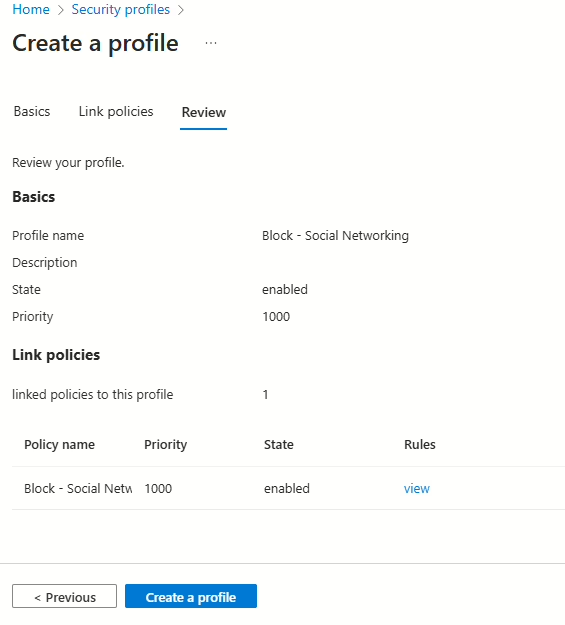
Press Create a profile.
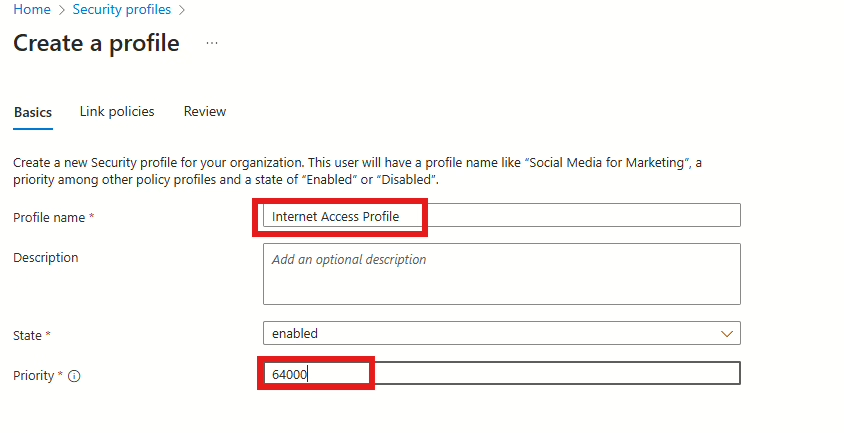
Next, we need to add the block Web content filtering policy. This is done by creating another Security profile, but this time we will not name it “Block – Social Networking.” Instead, we will provide it with a more generic name like “Internet Access Profile.“
The reason for this is that when we need to add another Web content filtering category to be blocked, we will just add it to this one. This Security profile will be used in the CA policy, so to avoid the hassle of creating multiple CA profiles for Security profiles that block web traffic, we will create this Security profile to contain all the block rules.
Name: Internet Access Profile
Priority: 64000
The reason for 64000 is that the baseline profile that allows all traffic is 65000. By having the block policy “in front of that,” we can ensure that the correct categories get blocked. By having the “allow” profiles at a much lower range, we can make sure that the needed priorities are easy to understand and maintain and get processed the correct way.
Now that the policies are configured and in place, we can move on to the Conditional Access policies.
Configuring the Conditional Access Policies
I won’t go into much detail on how Conditional Access policies work or the specifics of configuring one. We need to create two policies. If you are already using GSA, then the first policy might not need to be created. This is the “default” CA policy for GSA that will process the “Baseline” profile for all internet traffic in GSA.
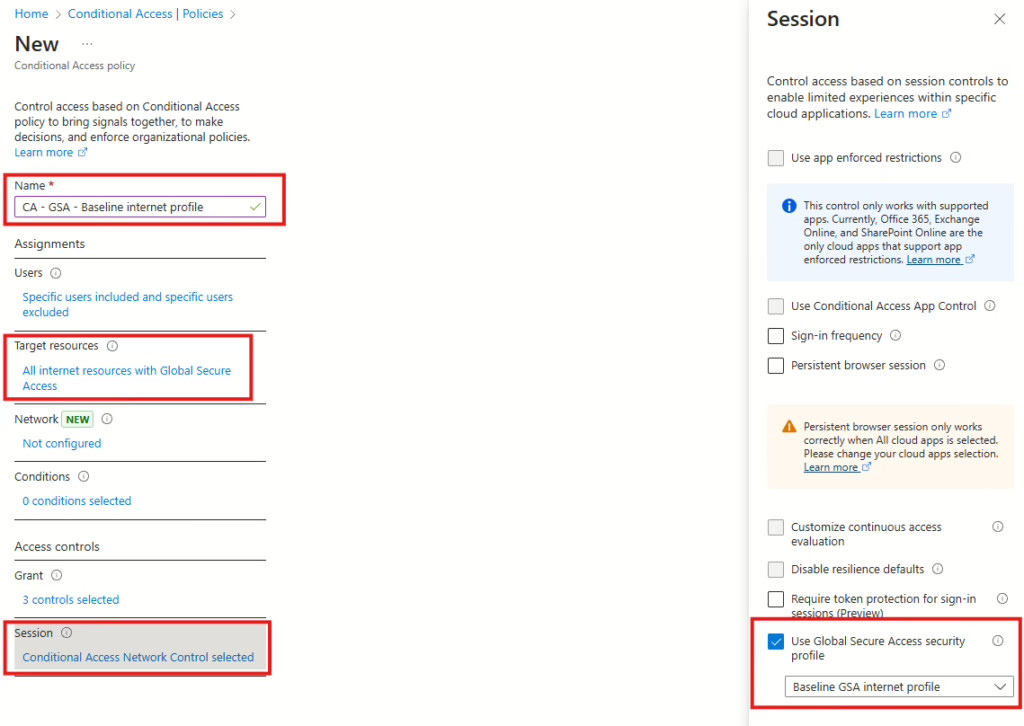
Start by navigating to Conditional Access policy and create a new one – You can use this link: Conditional Access Policy.
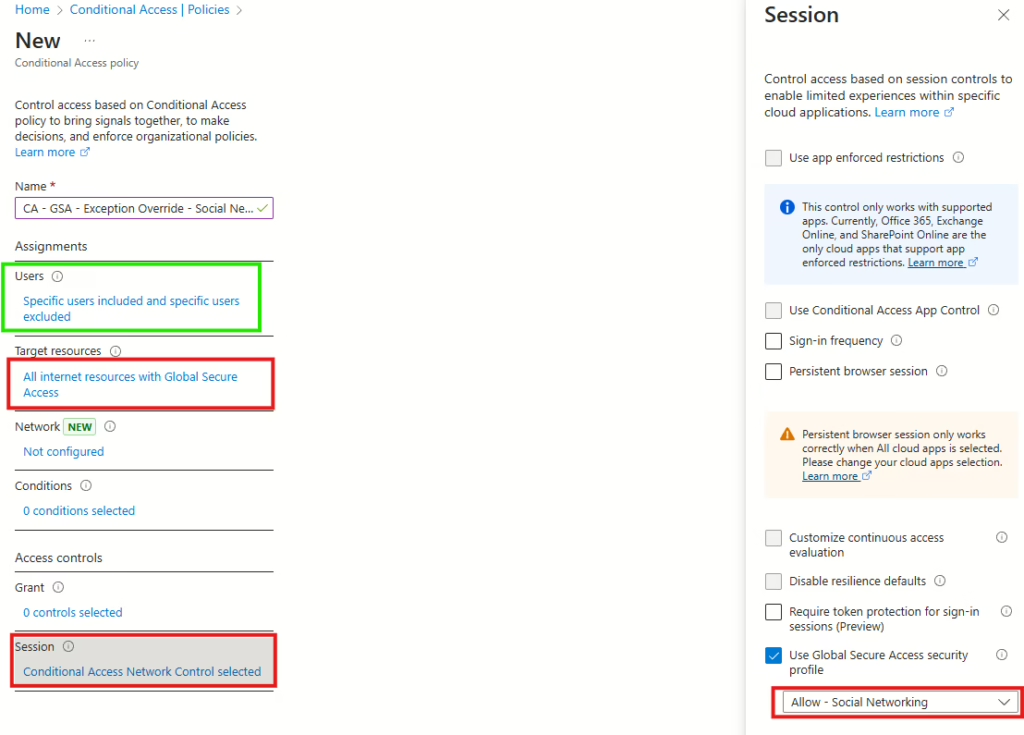
In the baseline policy, you need to select “All internet resources with Global Secure Access” in Target resources. Then, in Session, select “Use Global Secure Access Security profile,” and then select the baseline GSA internet profile that was created earlier (or the name of the default you already have in place).
The traffic logs in the GSA admin portal show that the user is blocked from accessing facebook.com.

With this policy in place, when a user attempts to access facebook.com, for example, it will be blocked. So, in order to enable users to bypass this block, we need to create another CA policy that will allow access to Social Networking sites. Before we create the CA policy, we need to create an Entra Security group that will be targeted by the CA policy.
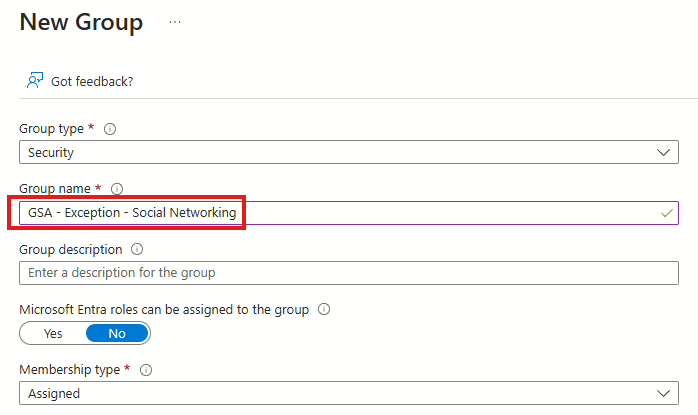
When the group is created, we can create the CA policy that allows the traffic. Remember to select the group in Users (green) in Include.
In Session control, make sure that you select the GSA Security profile named “Allow – Social Networking.”
We have now configured the CA policy so that the exception can be handled. An admin can add a user to the group that was created, and that user can now access Facebook.
We can see in the traffic logs in the GSA admin portal that our user is blocked from accessing Facebook now:

Setting up Self-Service
As mentioned at the beginning of the blog post, the self-service will be built around Entra ID Governance entitlement management, where we will create an access package and add the Entra Security group to that access package.
Navigate to Entitlement Management in Entra ID Governance in order to create the access package – You can use this link: Entitlement Management.
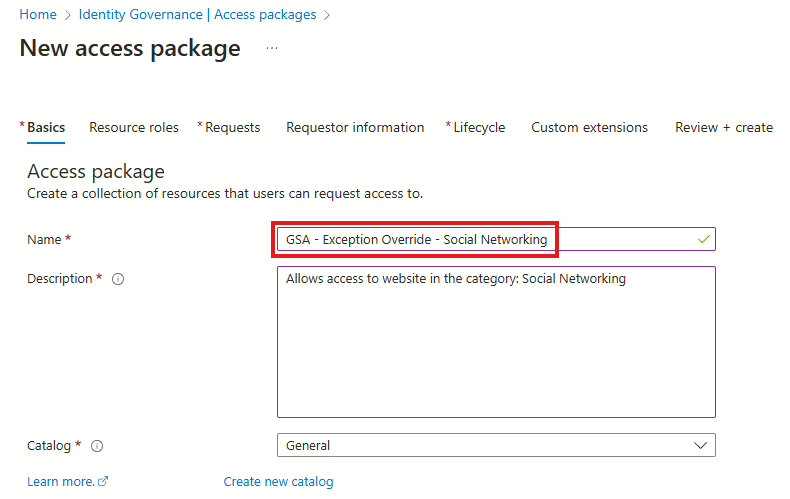
Select “+New access package,” provide the access package with a fitting name, and select a catalog of your choosing or use the Default General (Note: you can’t move it later to another catalog).
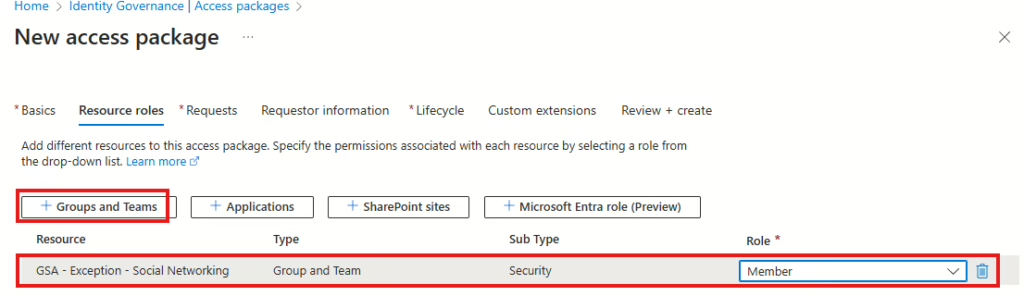
Now add the group we created earlier to the access package in the Resource tab.
The next step is to configure the requester policy. You can use my sample below as inspiration, but it’s solely up to you to define this. I have chosen to enable all users to request this access package and let the manager be the approver, with an admin as fallback in case the manager doesn’t approve. The request requires a justification from the requester, but not from the approver.

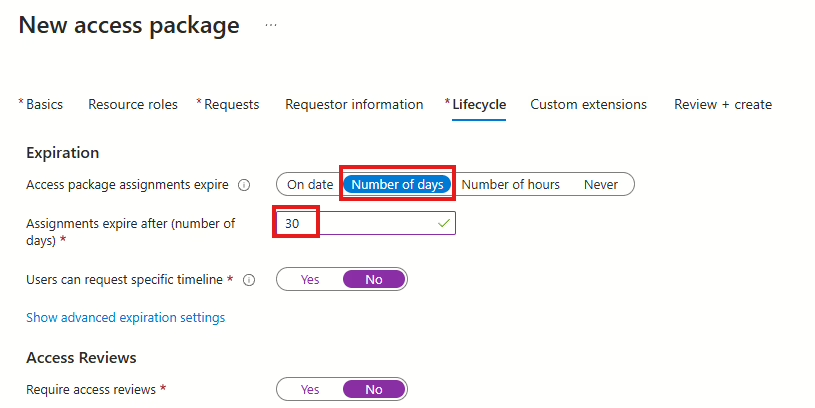
The last step in the creation of the access package and in configuring the self-service is the Lifecycle. This is an important part of all of this because this is where we will configure how long the user is assigned the exception.
I have configured it to 30 days because, in my experience, this is the most requested number of days users need an exception for such a policy. However, you can choose the number of days (or hours) that fits your needs.
When the Lifecycle policy is configured, then press next and then create.
Users are now able to request the access package via https://myaccess.microsoft.com/

If you want to exempt some users permanently, you can add the group to a specific department’s access package or just add the users directly to the group. This won’t interfere with the self-service since the access package policy will only add or remove users that are part of the access package, not users directly assigned to the group. If you want to go with that approach, I recommend setting up an access review on the group.
An alternative approach is to create one more group, add that group to the Allow CA policy, and then add the group separately to a department access package.
Wrapping up
In this blog post, we covered how to create Web content filtering policies and combine them with Conditional Access policies. Together with Entra ID Governance entitlement management access packages, we have set up self-service for users. By combining all these technologies, we can achieve a high level of security when it comes to users browsing the internet, while also handling edge cases where users need a temporary exception, which can be difficult to set up and maintain in a traditional setup.
To keep this simple and not provide users with too much “freedom” on the internet, you will have to repeat this process for each web content filter category you want to allow exceptions in. You can, of course, skip creating the baseline CA policy; you will only need to add the block policy to the baseline profile.
I believe that when rolling out GSA in your organization, if you tell the users that they are more limited on the internet than before but have the option to request exceptions with manager approval, they will be more likely to embrace the change.