In my previous blog post regarding A way to handle distribution lists with Entra ID Governance, I described the process of creating an access package for each department and office location within my company. These access packages were utilized to manage memberships of Exchange Online distribution lists, as well as security groups in Entra ID and various applications.
Manually creating all these access packages through the Entra ID Governance portal would have been time-consuming and prone to errors. Therefore, I decided to use PowerShell with Microsoft Graph to automate this task. By developing reusable “access package templates” in PowerShell, I was able to streamline the creation process.
This approach enables me to efficiently create new access packages as needed, whether they pertain to departments or other criteria in the future. In this blog post, I will share the PowerShell code in segments to encourage you to develop your own PowerShell access package templates. At the end of the blost post, I will provide my template for creating an access package with PowerShell, which includes a request policy, auto-assignment policy and the use of a custom extension when an assignment is granted.
Pre-requesites
- Microsoft Graph PowerShell module
Creating a ‘plain’ access package
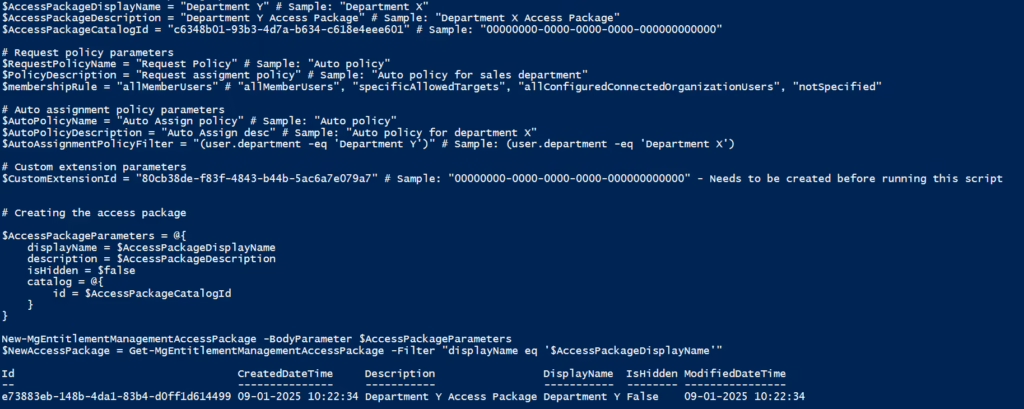
We will start with the absolute basic, which is to just create an access package, but nothing else. No Policy, no requester setting etc.:

You need to provide the above script with a DisplayName for the access package and a Description for the access package. Please keep in mind that the Catalog where the access package needs to reside must be created beforehand. The last value you need to provide is the ID of the catalog. This can be found by navigating to this URL: Identity Governance – Microsoft Entra admin center and then selecting the catalog from the list. The ID can be found on the left side of the screen:

Or you can run this command to get all Catalogs in Entra ID Governance Entitlement Management:
Get-MgEntitlementManagementCatalog.

When you have provided the PowerShell script with values and run it, you should see the access package created in the Catalog:

Creating a Request Policy for an access Package
Now that the ‘plain’ access package has been created, we can proceed to create and add a policy that allows all members (excluding guests) to request the access package and then get approval for a specific user(s):
In the above PowerShell script, you only need to provide the ID of the access package and the Object ID of the user(s) you want as approver(s). The ID of the access package can be found by navigating to the access package in Entra ID Goverance Entitlement Management portal and selecting the access package in the same way with the Catalog:

Or you can run the following PowerShell command. This will return the ID of the access package:
Get-MgEntitlementManagementAccessPackage -Filter “displayName eq ‘$AccessPackageDisplayName'”
After running the PowerShell script, you should be able to see the policy added to the access package.

Creating an Auto Assignment Policy
You can have multiple policies on an access package. If you want to have an access package where users are automatically assigned, then you should also, in my opinion, add a policy that enables users to request the access package. This PowerShell script will add an auto assignment policy. It is fairly simple; it will auto-assign all users that have the “Department X” value in the Department attribute in Entra ID. It might be a good idea to add another criterion in the filter, like user.accountEnabled -eq True.
The above PowerShell script will, as mentioned, add an auto assignment policy to an access package. You need to provide the ID of the access package and then define the auto assignment filter query (line 8).
When you have provided the information and run the PowerShell script, you should be able to see the policy added to the access package right away.

If you have created a custom extension to be used when access package assignment is granted or removed (or other statuses), you can add this PowerShell code to the policy you are creating. This code should be added after the AccessPackage ID parameter (looking at the above code, add the following between lines 29 and 30), and replace $CustomExtensionId with acutal id of the Custom extension. All Custom extensions ID’s can be found by running this command:
Get-MgEntitlementManagementCatalogCustomWorkflowExtension -AccessPackageCatalogId “CatalogId”
The Template
As I promised at the beginning of this blog post, I wanted to share the template used to create all the access packages for my departments and office locations. The following PowerShell script requires all the same values in the variables that have been mentioned in this blog post. So, without further ado, here it is:
Wrap up
We have now reached the end of this blog post, and I hope that I have inspired you to create your own template for creating access packages in Entra ID Governance. As you transition to using Entra ID Governance more and more, you will need to create a lot of access packages (that is my experience at least). By doing this with PowerShell (or another semi-automated way), you will greatly reduce errors.
This blog post has been written in hopes of keeping it simple to create an access package with PowerShell. I hope that after you read (or glance over) it, you feel that it is not too advanced to accomplish.
