If you have been working with Entra ID Governance, you probably figured out that there is no native way of working with Exchange Online (or On-premises Exchange) resources. So, you will have to get creative in how to manage members of distribution lists memberships at a scale in Entra ID Governance.
In this blog post I want to share with you the way that I choose to handle memberships of distribution lists by using Entra ID Governance entitle management. It is built around the use of PowerShell and a JSON file. Before getting into the more technical part, I what to share the thoughts and the design philosophy behind this approach. As mentioned the is no native way of handling memberships of distribution lists in Entra ID Governance (as of this writing) so, when I first started to think about a way of how to manage distribution lists members, my initial design was to use the extension attributes of the Distribution lists and match it against the users attributes in Entra ID using the Microsoft Graph, but I came to the conclusion after a while that it was not so easy to manage as I first thought it would be, and it was not any easier for my colleagues to help me maintain the logic of using the extension attributes, because after a short while I was using 6 extension attributes in the logic, and a lot of different combination, and the PowerShell code became almost too complex to achieve it is goal. I remember discussing the design and the logic with a colleague (I my mind he is one of the best when it comes to PowerShell), and after a few hours we both arrive at the conclusion that it need to be simpler, because if we thought it was complex to understand and maintain, then it could prove to be even more difficult to understand for our colleagues or even the next person after us, and I hated the idea of creating a solution nobody would dare to touch beside myself.
In my environment I have created an Access Package for each department and office location and Employee type). I decided to create a JSON file where I created an object in JSON file for each Access Package that I wanted to be associated with a Distribution list and then added one or more distributions lists to each object (Access Package) in the JSON file.
In my mind it would make it easier to understand (as long as the documentation is well written). I then decided I would host the JSON file in GitHub (private company repo). By having the JSON file in GitHub, I removed the need to have it locally on a server that needed to be updated manually whenever a change to JSON file was made, and then again by having the JSON in GitHub I can track changes to the file by viewing the history.

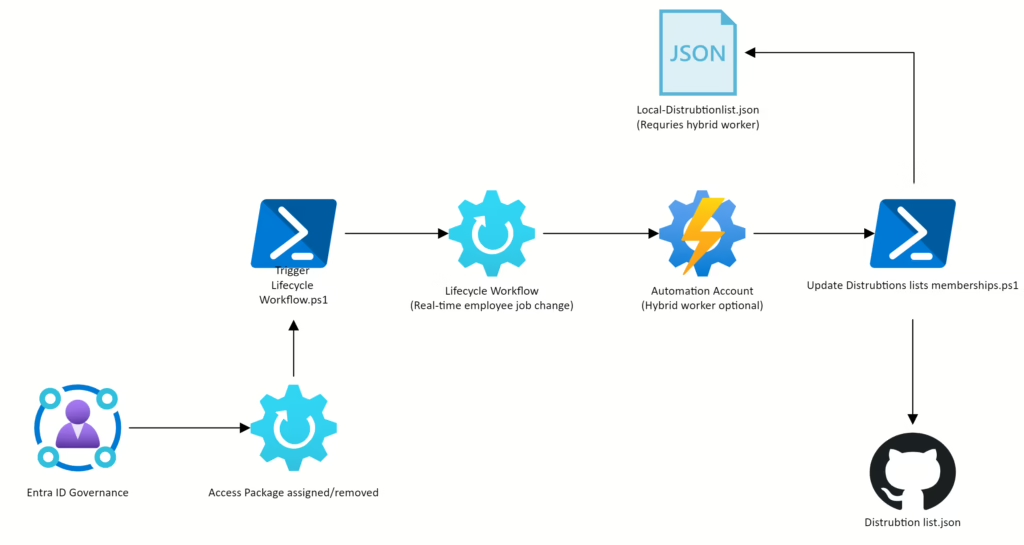
The logic for the PowerShell script is not that advanced, and I will show case it later in the blog, but it is basically: If user A is member of Access Package X & Y then add the user to Distribution lists A & B, but if the users is a member of Distribution list C and distribution list C is associated with Access Package Z, then remove the user, if the user is not assigned access package Z.
The way this is implemented is by creating a Lifecycle Workflow and then having that Lifecycle Workflow run that PowerShell script every time a user is added or removed to an access package.
Pre-requisite resources
- Azure Automation Account (Hybrid worker if JSON is hosted local)
– With Exchange online management PowerShell module installed
– With Microsoft Graph PowerShell modules installed - Exchange admin assigned to the Automation Account or Azure VM (Hybrid worker)
Use Azure managed identities to connect to Exchange Online PowerShell
Privat GitHub repository (optional) - Service Principal with following Microsoft Graph Permissions:
– LifecycleWorkflows.Activate
– User.Read.All
The JSON file
The JSON file’s structure is as mentioned designed so that each object in the JSON file represents an Access package, and then Distribution list(s) is added to each object . This is relatively straightforward:
You will of cause need to adjust the above JSON file with your own access packages id’s. This can be found be navigating to any access package and then selecting the overview tab:

The distribution lists need to be added with the email address and not the display name. If you want to host the JSON file in GitHub, I’ll suggest reading the following blog post to get a better understanding on how to do it – Just replace the word SQL with JSON 😊 – Import SQL query from GitHub repository into a PowerShell script. It’s the same approach regardless of file type. If you want the JSON file to be hosted locally (Azure VM), you can use JSON-Local version I have linked to further down in the blog post.
The PowerShell script
Now we are at the engineering part. The PowerShell script will connect to Exchange Online by using the Automation Accounts managed identity (or the Hybrid worker) and then connect to GitHub to fetch the content of the JSON file.
By using the JSON file structure, the user will be added to the distribution lists they need to be a member of and removed from the ones where they no longer need to be a part of, based on what access packages the user has assigned.
Please note that the script will only handle Distribution lists that are a part of the JSON file. That means that if a user is a member of 5 Distribution lists, and only 4 of them are in the JSON, then the user won’t be removed from the last one since it’s not a part of the JSON file.
PowerShell script – GitHub JSON version:
PowerShell script – Local JSON version:
Entra/Governance/Entitlement Management/Manage Distribution list/LocalJSON-AddRemoveUserFromDL.ps1 at main · ChrFrohn/Entra
Once the PowerShell script has been modified to fit your own needs. Insert the PowerShell script into a new runbook in your Automation Account.

Then navigate to Entra ID Governance, we need to create a Custom extension to run this PowerShell script with the JSON file – Link: https://portal.azure.com/#view/Microsoft_AAD_LifecycleManagement/CommonMenuBlade/~/customExtension

Provide the Custom extension with a name that to find fitting for this – I’m using this:
Name: LW – Exchange – Manage distributions lists
Description: Adds or removes users to Exchange Online Distribution lists
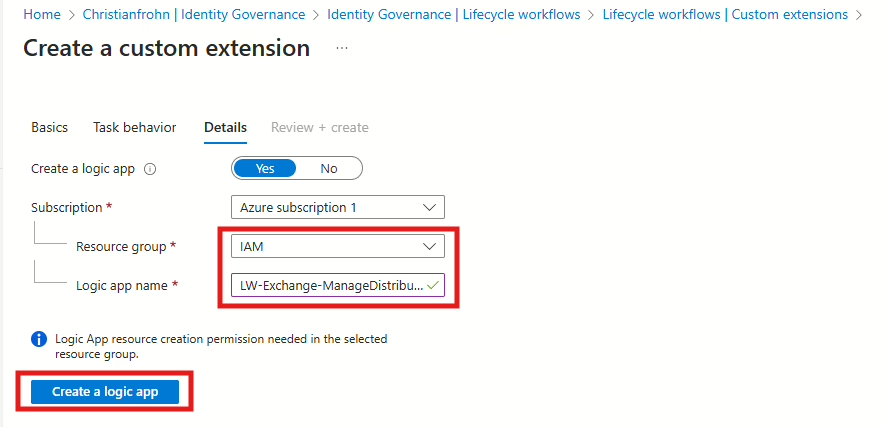
After typing name and description, in the next step select Launch and wait, and then in the last step select the resource group and the name of the Logic app that is about to be created as Custom Extension:

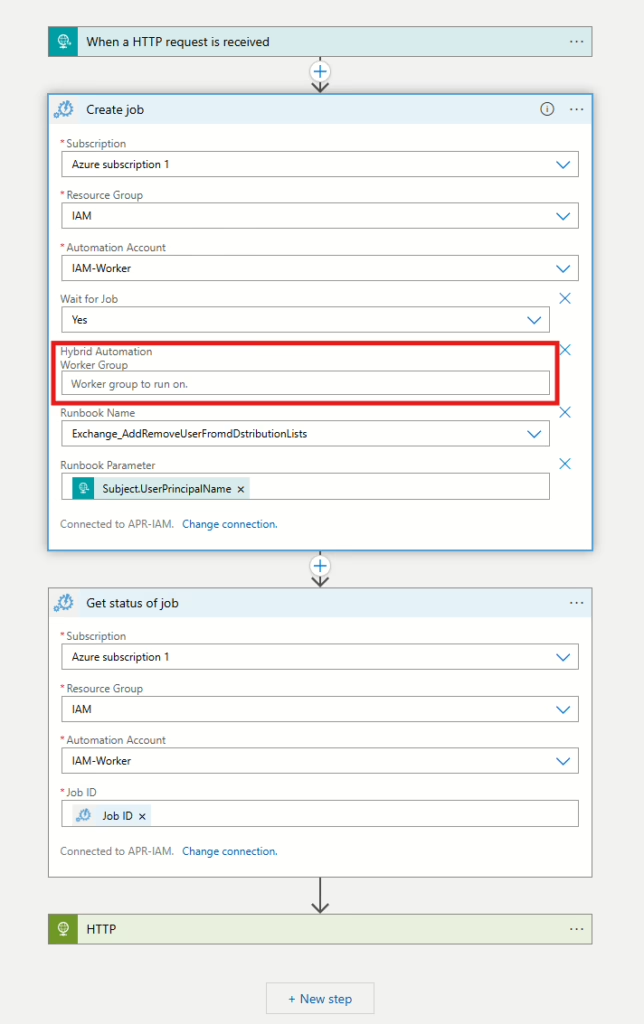
When the Logic app is deployed, select next, and then create to complete the creation of the Custom Extension. Now navigate to the Logic app that was just created and select Logic app designer and add Azure automation as step between the two default steps that are already in the Logic App, when Azure automation is selected, then select Create job.
If you plan on placing the JSON on the Azure VM, then make sure you select the parameter Hybrid Automation Worker Group and then type the name of the Hybrid worker group into that field, otherwise it won’t load the content. If you plan on hosting the JSON in Github, dont select Hybrid Automation Worker Group.

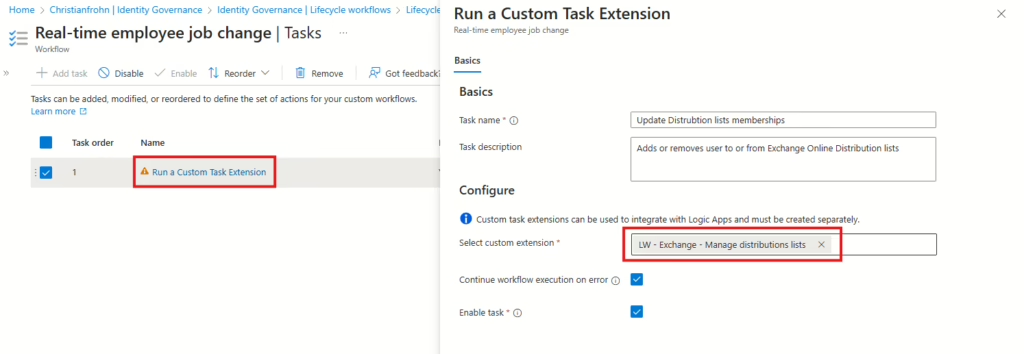
When you have finished, then select save and navigate back to Entra ID Governance, the next step in this to add the Custom extension as task to Lifecycle Workflow that will run every time a user gets an Access Package assigned to them.
The first Lifecycle Workflow in Entra ID Governance I’m going to add the Custom extension task to is a new one based on the template Real-time employee job change – ON-DEMAND this is because the Lifecycle Workflow will be triggered by another PowerShell script that starts this Lifecycle Workflow when a user is added or remove from an Access Package.

When the Custom extension is added to your Lifecycle Workflow, you can then test it by running the Lifecycle Workflow on demand or running the PowerShell script directly from the Automation account to see that everything is working as intended.
Triggering the Lifecycle Workflow when Access Package is assigned.
To run a Lifecycle Workflow when an Access Package gets assigned or remove, we are going to create a Custom extension in Entra ID Governance Entitle Management in the catalog where the Access Packages are created. The process is the same as creating them to be used in Lifecycle Workflows, only difference is that need to navigate to the Catalog of the Access Packages to create it . But before we create a Custom extension in Entitlement management, we first need to ad the following PowerShell script to the Automation account.
This PowerShell script will start the Lifecycle Workflow that runs PowerShell script that that updates the users Exchange Online distributions lists memberships:
You need to provide the script with Lifecycle Workflow ID (can be found by navigating to the Lifecycle Workflow’s overview pane) – You can read more details about it here: Start Lifecycle Workflow in Entra ID Governance with PowerShell.
When that PowerShell script is added to the Automation account, we can then proceed to create a Custom Extension in Entitle management.
A Custom Extension in Entitle management is created by navigating to Entitlement management in Entra ID Governance and then selecting Catalogs and the Catalog where the access packages are created.

Then select add a Custom extension in the top, and then follow the same procedure as the first Custom extension that was created in the Lifecycle workflows.
When the Custom extension has been created, all that is left is to modify the policy(s) for each access package to run this Custom Extension when a user is assigned the Access Package or removed.

Closing remarks
One of the benefits of triggering a Lifecycle Workflow when an Access Package is assigned or remove is that you can configure more task easier, because once you have build the automation, the only thing you really need to add more tasks is to add them to the Lifecycle Workflow.
It is worth noting that this approach to handle Distributions liste could also be applied to On-premises Active Directory security groups in the same way.
