Have you ever asked yourself this question after setting up Microsoft Entra ID Lifecycle Workflows and API-driven user provisioning: “What happens if one of my colleagues changes a user attribute in Active Directory (AD), will Entra ID Governance correct it?”
The answer to this question is: “No, it won’t”. Or like an IT consultant would answer it: “It depends…”
And the IT consultant isn’t wrong, but not quite right either, because it really depends on what attribute that is getting modified and how you have configured your Lifecycle Workflows in Microsoft Entra ID Governance. It is possible with the Lifecycle Workflow Mover templates to make a Lifecycle Workflow trigger based on a single attribute getting changed, but you will have to create a Lifecycle Workflow for almost all attributes and then add the same task(s) to every one of those Lifecycle Workflow, and again there are some attributes you can’t create triggers for. So, it’s not quite feasible to create duplicate Lifecycle Workflows for every attribute to achieve alignment with the HR systems data.
So, how do you solve the “problem” of users being misaligned with HR system data because a colleague changed one or more attributes in Active Directory?
The solution I found was to use Microsoft Sentinel to create an incident for when a user object in Active Directory has been modifed, and then run a Playbook in Sentinel every time that incident got created. That Playbook would then run a PowerShell script to start a Entra ID Governance Lifecycle Workflow where one of the tasks is to update the user based on data from the HR system. The reason for doing this is because in my mind it doesn’t matter what attributes or how many that got change, because by using the API-driven user provisioning to update user, I don’t have to worry about that because the API-driven user provisioning will handle what attributes that needs to be updated/corrected.
My way of using the API-driven user provision is that when a user is updated in the HR system, I’ll fetch all the user’s relevant information from the HR system and then send it to the API-driven user provisioning. The reason for that is, if the titel in the HR system and in AD are same, then API-driven user provisioning skips it’s because they are the same. But if they are not, the API-driven user provisioning will update it for me. This saves me a lot of coding since I dont have to compare and handle change attributes. (This is based on this blog post: Using API-driven user provisioning with an Azure SQL database as a source of truth)
A simple way to phrase all of this is like this: Trigger Lifecycle Workflow in Entra ID Governance based on a Microsoft Sentinel incident.
This is a high-level drawing of the setup
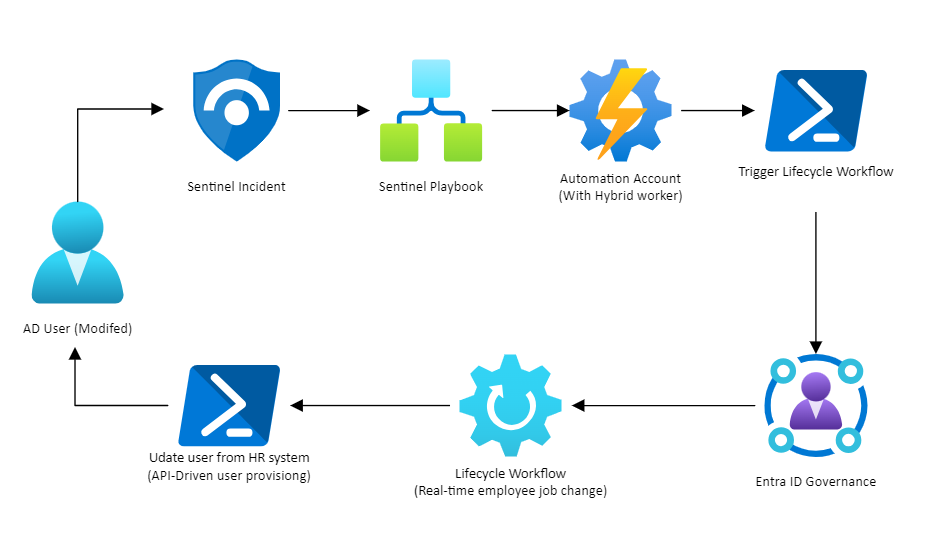
The bonus side effect of setting this up, is that you can change an attribute on a user in AD and just sit back and wait for the user to be fully updated/corrected.
Pre-requisite resources:
- Microsoft Sentinel setup with security logs from Active Directory
- Azure Automation account (And Hybrid Worker)
- API-Driven User provisioning
You need to have all of this created before reading on as I will not cover setting up this.
The Lifecycle Workflow part
As mentioned in the beginning, we are going to trigger a Lifecycle Workflow based on a Microsoft Sentinel incident, but to do that we first need to have a Lifecycle Workflow to trigger, and then we are going to run a PowerShell script that will perform the triggering of said Lifecycle Workflow.
The Lifecycle Workflow I’m using is based on the template: Real-time employee job change
This Lifecycle workflow is best suited for me since it doesn’t run on a schedule and must be run on-demand. But you can use any Lifecycle Workflow you have already configured if you like.
You properly already have a Lifecycle Workflow that updates users based on your HR system data based on you own conditions, so I’ll suggest you copy that Lifecycle Workflow and then use that in this setup.

Select the Lifecycle Workflow template of Real-Time employee Job Cahnge and configure the tasks you want to be run.
I’m going to run to a Custom Task Extensions that updates the user in Active Directory. The Custom Task Extensions is a PowerShell script that updates the user in Active Directory based on data from an Azure SQL database as explained in this blog post: Using API-driven user provisioning with an Azure SQL database as a source of truth – The PowerShell script I’m using is this:
PowerShell/UpdateUserFromHRDBWithAPIProv.ps1 at master · ChrFrohn/PowerShell (github.com)
This is a picture of the task that I run to make sure that a user information is aligned everywhere with the data in the HR system:

When your Lifecycle Workflow is ready, you then need to navigate to the overview of the Lifecycle Workflow and copy the Workflow Id. We are going to need that in the PowerShell script that will be used to start this specific Lifecycle Workflow based on the Microsoft Sentinel incident.

Start Lifecycle Workflow from PowerShell
The way the Lifecycle Workflow will be started based on the Microsoft Sentinel incident is by using running a PowerShell script in Automation Account in Azure that has a Hybrid Work.
The hybrid work part is important since we will be using the Active Directory PowerShell module (RSAT) in the Hybrid Worker VM. This because the KQL query that will be used in Sentinel will return objectGUID of the user that was modified and then be used to look up the user in AD to get the UPN of the user to then be used to look up the user in Entra ID using the Microsoft Graph to get the users Object ID that is need to start the Lifecycle Workflow for that user (Not pretty I know)
You need to create a Runbook in the Automation Account with Hybrid worker that contains this PowerShell code:
The PowerShell script uses the Active Directory and Microsoft Graph PowerShell modules.
You need to provide the authentication information for the following:
- Active Directory – Read user objects
- Microsoft Graph – User.ReadAll & LifecycleWorkflows.ReadWrite.All
The last thing you need to provide is the Workflow Id in line 7

Once the Runbook has been created with the PowerShell code, we can then move on to the Microsoft Sentinel part.
The Microsoft Sentinel part
So, let’s get started with the Microsoft Sentinel part. The first thing we need to do is to create a KQL query that will get change user object in Active Directory – and here it is:
This KQL query will look for Event ID 5136 – A directory service object was modified – It has been configured to search exclusively for users and will output the objectGUID and TimeGenerated for the user(s) whose AD attributes have been modified. The users ObjectGUID is the only “ID” besides the users display name that can be outputted. This is what was mentioned earlier that is going to be used to identify the user. Line 9 to 12 needs to be changed to fit your needs. Line 9 to 12 is the OUs in Active Directory that will be processed, this because we dont want to trigger this because a Service Account has been modifed (and it assumes that you have your Service account in different OU than your users). You need to add the OUs you want to include in the query.
Another thing to notice is that there is a “list” of Service accounts, this is because you are probably using a Service Accounts in other connection to perform operations on users or even in some of you Lifecyle Workflows and you don’t want those service accounts to trigger this. If you are curious to know what Service Accounts, you should add to list you can this KQL query:
This will summarize all the accounts that has generated event ID 5136, make a note of them and then add them to line 6 in above KQL query.
Now that the KQL query is ready we can move on to create the analytic rule that will generate the incident we will be using to trigger the Lifecycle Workflow in Entra ID Governance.
Navigate to Microsoft Sentinel and select Analytics in the left side menu and then Create a new Scheduled rule:

Now, the first thing is to provide the basic information like a Name of the rule, description and Severity my suggestion for this is this:
Name: User object modified in AD
Description: A user object was modified in AD – Event ID: 5136
In Severity I’ll suggest Informational since the incident is just information to us because it will be handled automatically and closes automatically. But the choice is yours.
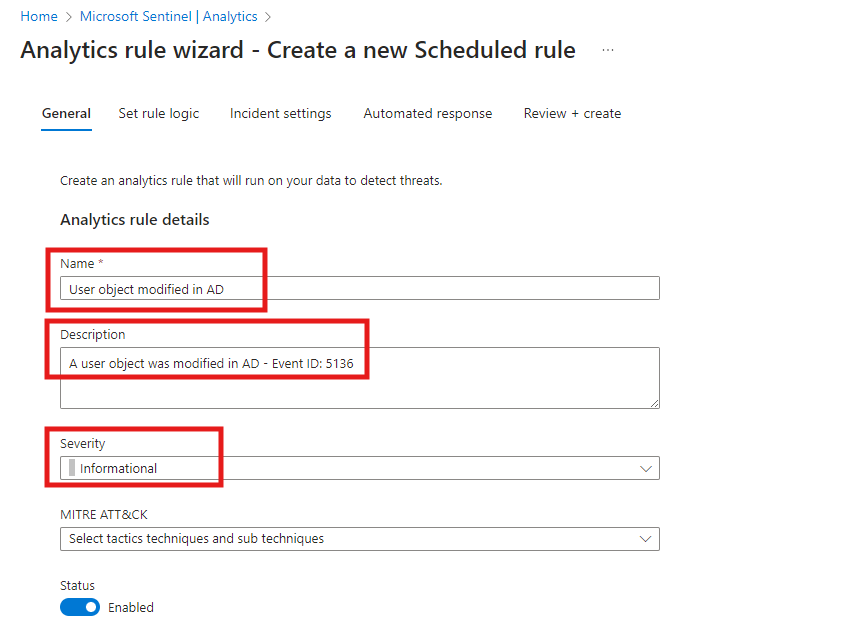
Next step is the rule logic, this where will paste in the KQL query from above and configure the rule logic like so:
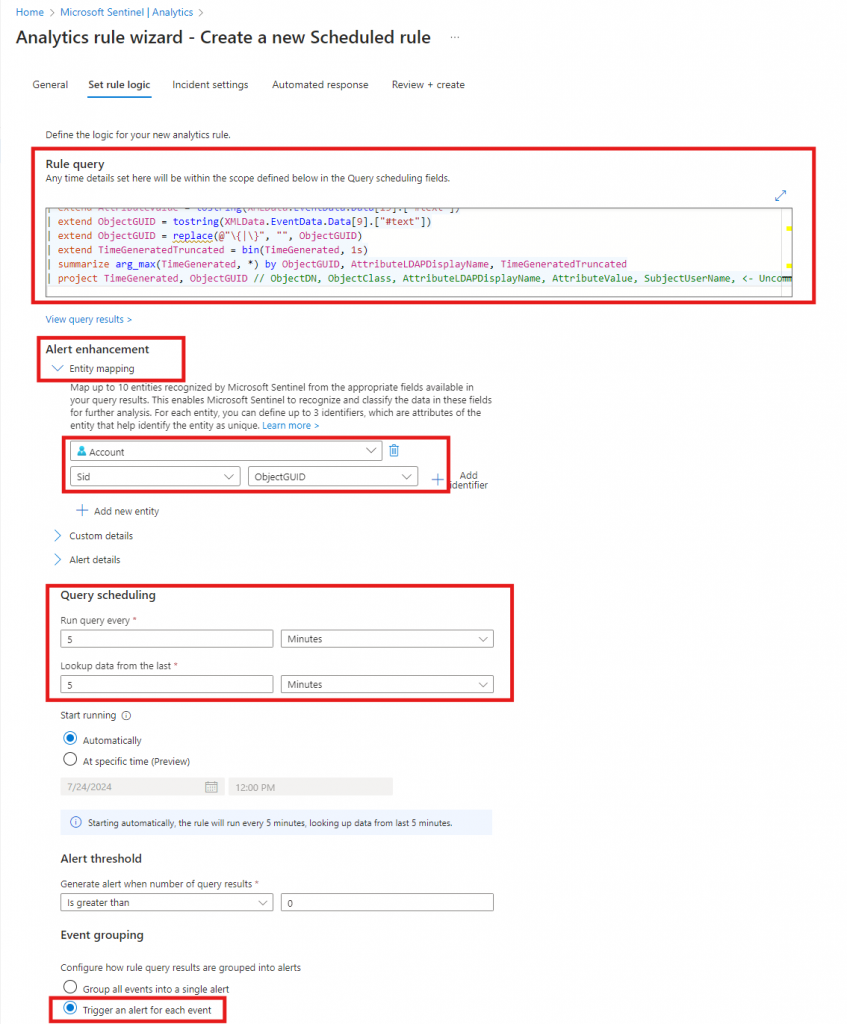
You need to expand Alert enhancement and add a new entity that maps Account / SID to ObjectGUID. This is needed parse it into the PowerShell script that will trigger the Lifecycle Workflow.
The other part of the rule logic is the schedule of query, I have set it to 5 min. in both options – This means that this query effectively runs every 5 min and looks 5 min back in time. This is to make sure I don’t miss anything or process the same user multiple times in bigger time spand. The last thing is to change Event grouping this needs to be set to Trigger an alert for each event. This is to make sure the system creates an incident for each result in the query.
When this is done, the rest of the creation of the analytic rule is standard where you dont need to change anything, so you can now press “next” for the next steps and create the alert.
The playbook
The next step is to create a Playbook in Microsoft Sentinel, this is the part where we will trigger the Entra ID Governance Lifecycle Workflow for the incident that will be created when the KQL query detects a change to a user object in AD. When we create a Playbook in Sentinel, we are actually creating a Logic App. It is in that Logic app we will build the steps to trigger a Lifecycle Workflow.
In the left side menu of Sentinel select Automation
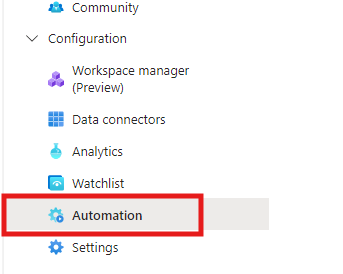
Then select Create in the top and select Playbook with Incident trigger

Now you will be presented with a simple form to create the Playbook, you only need to select the Azure Subscription and Resource group where the Playbook (Logic App) will be created. Then provide it with a suitable name and select next and then create. You don’t need to do anything else in the next two steps.

You will then be redirected to the Logic app that has been created. This is the part where we will configure the steps to trigger the Lifecycle Workflow, but also close the incident automatically. There is no need for the incident to be Active, since it has been handled automatically be running the Playbook.
Start by selecting New Step

And search for Microsoft Sentinel and then on list, select Entities – Get Accounts

This is where we will get the user that was modifed in AD. Remember from earlier where we mapped ObjectGUID. This is where we will be using it to process the user object that was changed in AD.
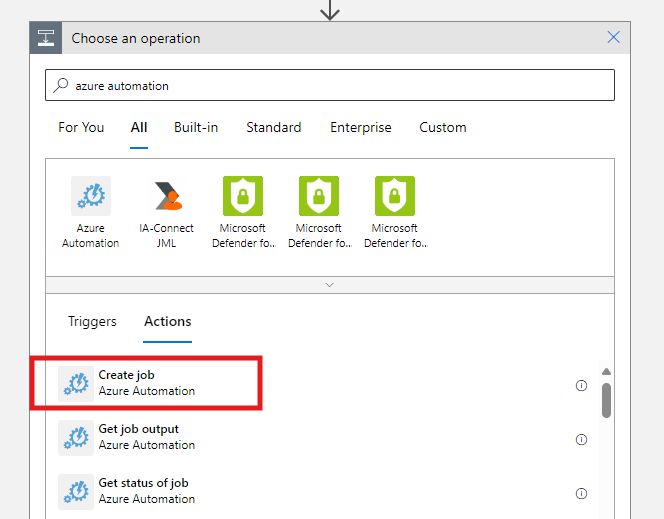
The next step will add Azure Automation, search for Azure Automation, and then select Create Job.
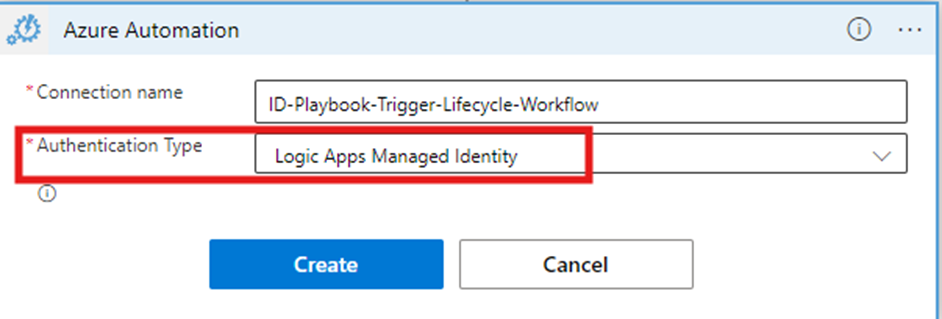
You may be asked to create an authentication connection. I’ll suggest you use Logic Apps Managed Identity and then provided that managed identity with Automation Operator permission on the Automation account

When you have completed this small task, we can then configure the Create Job step like this:

The last step we need to add is part that closes the Incident in Microsoft Sentinel, we need to search for Sentinel and then find Update Incident. Once selected you can then configure it as you see fit – Here is what I did:

Now Save the Logic app, we are now done with the configuration of the Playbook (Logic App)
Now we need to configure the Playbook to run when the incident is triggered. Navigate back to Automation in Sentinel and then select Create in the top of page, and the select Automation Rule

You will then be presented with a fly-out menu where you are able to configure the Automation rule. This where we will make sure that the Playbook we created only runs when this Incident is created – Like so:
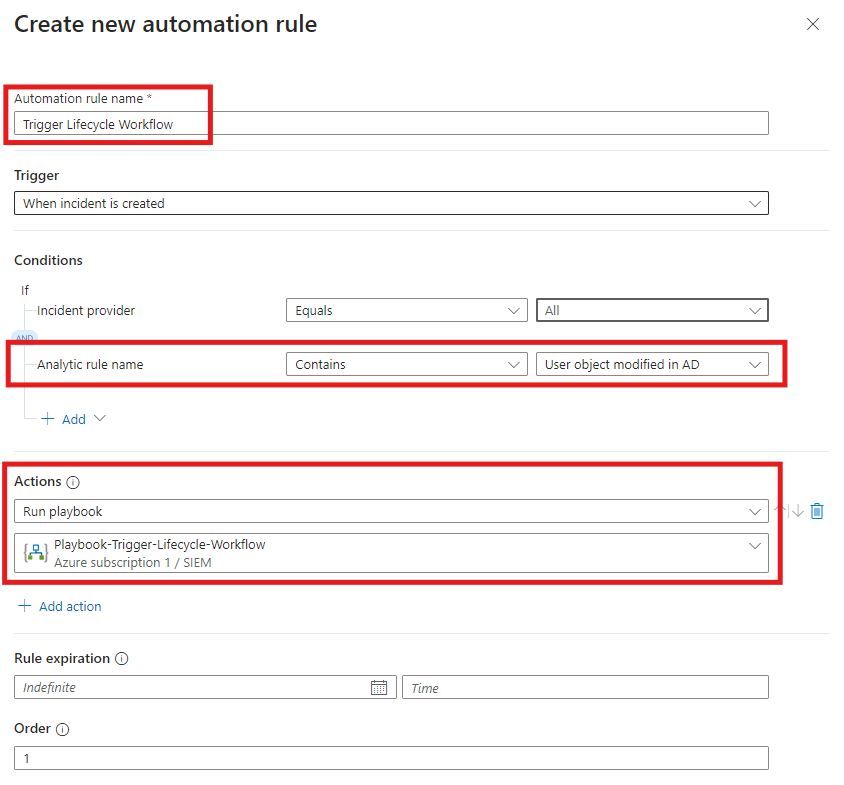
The Analytic rule name can be selected in the drop-down menu. You need to find the Analytic rule that you created in the beginning and then select Run playbook under actions and then select the Playbook that was created and configured.
All steps have now been configured and you can test it out by trying to modify an attribute on a test user (or your own user account)
Finale thoughts
This is in my opinion a neat way of making sure that user in Active Directory is align with the data in your HR system by combining Sentinel, Entra ID Governance and the API-driven user provisioning tool from Microsoft. But this is not the only thing this can be used for. What was accomplished in this blog was to trigger a Lifecycle Workflow in Entra ID Governance based on a specific Sentinel incident. But the same approach could also be used when a user is removed from an AD security group or even added, then another Playbook could trigger another Lifecycle Workflow to make sure the user is a member of your company’s “Default” AD security groups. But the concept of this can also be reused to just run a PowerShell script based on a Sentinel incident using a Playbook It really is only your own imagination that sets limit for what you can do with this.
