
To fully use Microsoft Entra ID Governance – more precisely lifecycle workflows -, you do need to configure a few things, although it is not mandatory to do it since all the lifecycle workflows can be run on-demand. But the whole purpose of lifecycle workflows is that they should run automatically based on attribute changes – like a user changing the department, or a user having their first or last day, this where EmployeeHireDate and EmployeeLeaveDateTime come into the picture.
It’s recommended to have an IAM system that updates these user attributes in Active Directory or Entra ID (or syncs them from AD to Entra ID) – You could use Microsoft API-driven user provision to write the values of those attributes in Active Directory – You can read here how to set it up https://www.christianfrohn.dk/2024/04/10/getting-started-with-api-driven-inbound-user-provisioning-to-on-premises-ad/. But the one important thing to set up is the EmployeeHireDate and EmployeeLeaveDateTime in Entra ID to fully automate the lifecycle workflows regarding onboarding or offboarding.
This blog post will cover how to set up the EmployeeHireDate and EmployeeLeaveDateTime user attributes in Active Directory and then using Microsoft Entra Connect Sync (formally known as Azure AD Connect) to sync them into Microsoft Entra ID, so they can be used in Microsoft Entra ID Governance (but not exclusively).
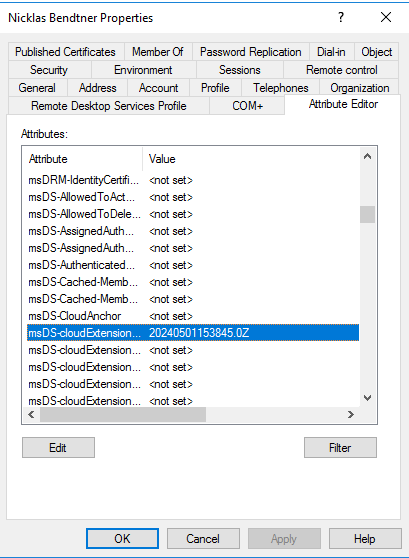
EmployeeHireDate and EmployeeLeaveDateTime are not two attributes in Active Directory that are standard, so the first thing we need to do is to select two attributes in Active Directory that are not being used, to function as EmployeeHireDate and EmployeeLeaveDateTime attributes. This could be msDS-cloudExtensionAttribute1 and msDS-cloudExtensionAttribute2 (But the choice is yours to make) by selecting these two attributes, we can then setup synchronization rules in Microsoft Entra Connect sync, to synchronize the values of these two attributes into EmployeeHireDate and EmployeeLeaveDateTime in Entra ID – While we are in the process of setting up new rules, we might as well setup EmployeeOrgData. EmployeOrgData covers two additional attributes: CostCenter and Division – These might come in handy with Lifecycle workflows at a later stage.
Setting up Microsoft Entra Connect sync rules
To set up the new synchronization rules we need to access the server where Microsoft Entra Connect sync is installed on.
The first and most important thing to do before we do anything is this – DISABLE THE SYNC SCHEDULER in Microsoft Entra Connect Sync. This is done via PowerShell (as admin) on the Microsoft Entra Connect sync server by running this command:
Set-ADSyncScheduler -SyncCycleEnabled $falseAnd then this to make sure it is stopped.
Get-ADSyncScheduler | Select-Object SyncCycleEnabled The output from this should be False – If that is the case, then no sync will happen until we turn it on again after we have configured our new synchronization rules.
Now start Synchronization Rules Editor as admin, this is where we will create our rules.

The first rules we need to create is the inbound rule for EmployeeHireDate:
Inbound rule for EmployeeHireDate:
Name: In from AD – EmployeeHireDate
Description: Sync of msDS-cloudExtensionAttribute1 to EmployeeHireDate
Connect System: The name of your on-premises domain
Connected System Object Type: user
Metaverse Object Type: person
Link Type: Join
Precedence: 700 (But any available number you want)
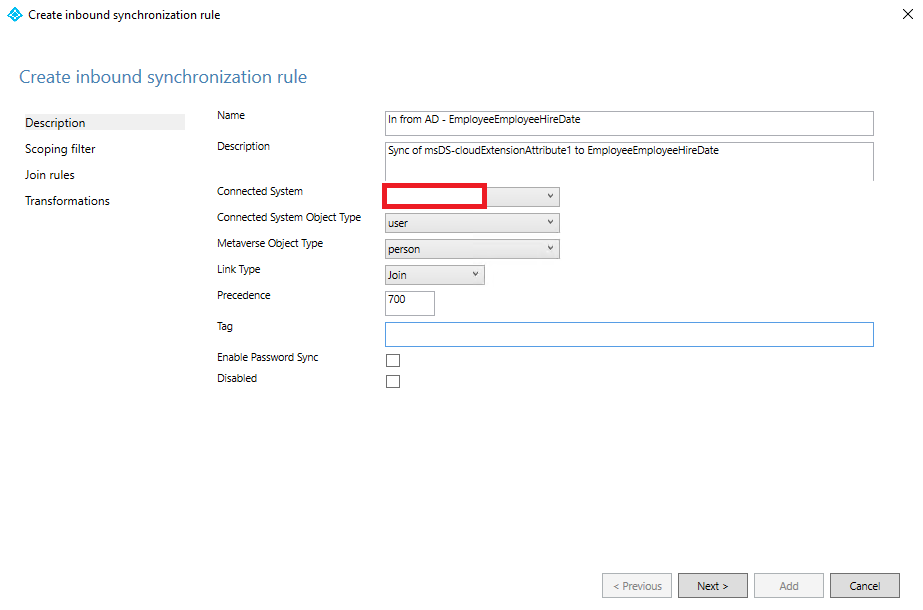
Once you have filled out the fields above, then select next two times – we do not need to do anything in Scoping filter and Join rules
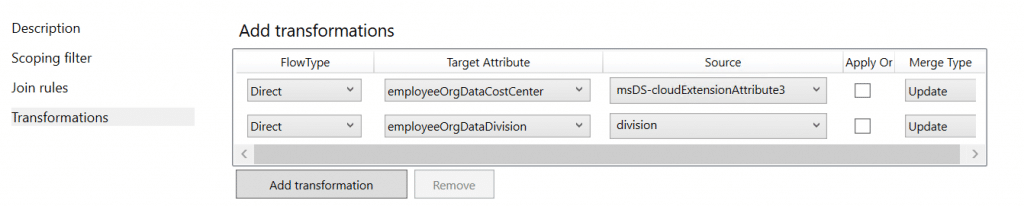
In the Transformations menu, we need to Add transformation – This where we will “bind” EmployeeHireDate and msDS-cloudExtensionAttribute1 to each other.
When you have added that, select Save.
Now we must do the same with EmployeeLeaveDateTime and EmployeeOrgData. The process for doing this is the same as above, only different values that are like this:
For EmployeeLeaveDateTime the inbound rule should be like this:
Name: In from AD – EmployeeLeaveDateTime
Description: Sync of msDS-cloudExtensionAttribute2 to EmployeeLeaveDateTime
Connect System: The name of your on-premises domain
Connected System Object Type: user
Metaverse Object Type: person
Link Type: Join
Precedence: 702 (But any available number)
Transformation:
FlowType: Direct
Target Attribute: EmployeeLeaveDateTime
Source: msDS-cloudExtensionAttribute2
Merge type: Update

For EmployeeOrgData we are going to add both CostCenter and Division in the same inbound rule like this:
Name: In from AD – EmployeeOrgData
Description: Sync of msDS-cloudExtensionAttribute3 to EmployeeOrgDataCostCenter and Division to EmployeeOrgDataDivision
Connect System: The name of your on-premises domain
Connected System Object Type: user
Metaverse Object Type: person
Link Type: Join
Precedence: 704 (But any available number)
Transformation (add two):
FlowType: Direct
Target Attribute: EmployeeOrgDataCostCenter
Source: msDS-cloudExtensionAttribute3
Merge type: Update
FlowType: Direct
Target Attribute: EmployeeOrgDataDivision
Source: division
Merge type: Update
I am using the native Active Directory attribute Division since they are alike in terms of the value of the attribute.
Outbound rule for EmployeeHireDate
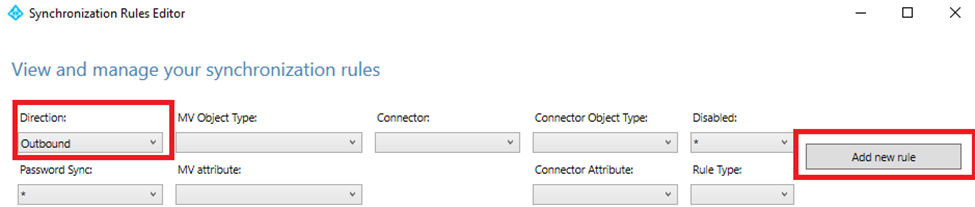
Now we have configured the inbound rules, now we need to configure the Outbound rules. Start by changing Direction in the Synchronization Rules Editor to Outbound and then select Add new rule.
The creation of outbound rules is the same as creating inbound rules. But this time the Connect System will be the name of our Entra ID domain – christianfrohn.onmicrosoft.com.
The first Outbound rule will then look like this:
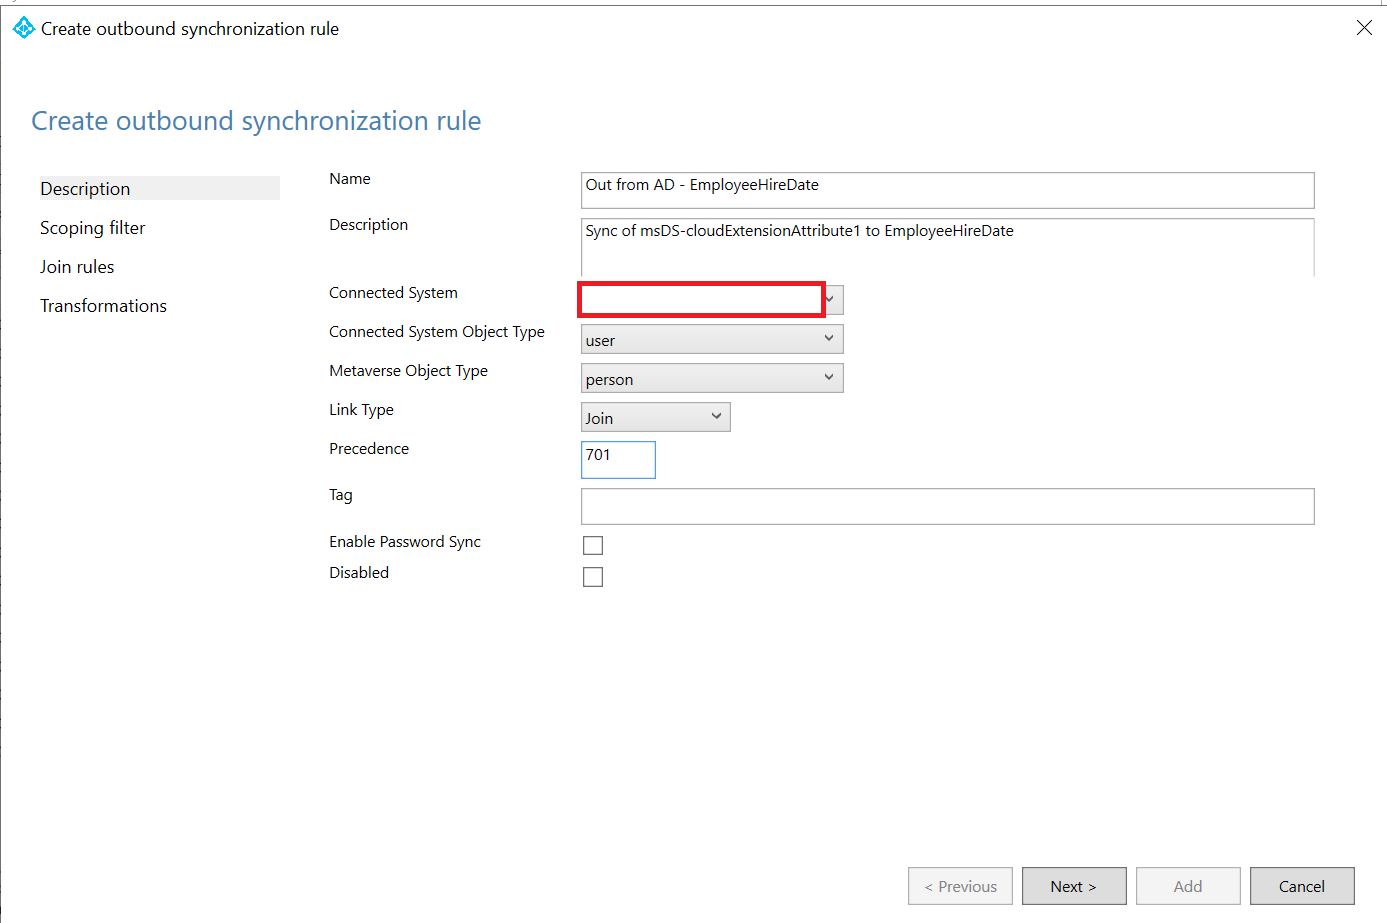
Name: Out from AD – EmployeeHireDate
Description: Sync of msDS-cloudExtensionAttribute1 to EmployeeHireDate
Connect System: The name of our Entra ID domain
Connected System Object Type: user
Metaverse Object Type: person
Link Type: Join
Precedence: 701 (But any available number)
And as the same with inbound rules, we are skipping Scoping filters and Join rules, and there my moving to Transformations.
FlowType: Direct
Target Attribute: EmployeeHireDate
Source: EmployeeHireDate
Merge type: Update
When you have added that, select Save.
And again, as earlier with inbound rules we have to repeat this for the other attributes – EmployeeLeaveDateTime and EmployeeOrgData.
For EmployeeLeaveDateTime the outbound rule should be like this:
Name: Out from AD – EmployeeLeaveDateTime
Description: Sync of msDS-cloudExtensionAttribute1 to EmployeeLeaveDateTime
Connect System: The name of our Entra ID domain
Connected System Object Type: user
Metaverse Object Type: person
Link Type: Join
Precedence: 703 (But any available number)
Transformation:
FlowType: Direct
Target Attribute: EmployeeLeaveDateTime
Source: EmployeeLeaveDateTime
Merge type: Update

For EmployeeOrgData we are doing the same again:
Name: Out from AD – employeeOrgData
Description: Sync of msDS-cloudExtensionAttribute3 to EmployeeOrgDataCost center and Division to EmployeeOrgDataDivision
Connect System: The name of our Entra ID domain
Connected System Object Type: user
Metaverse Object Type: person
Link Type: Join
Precedence: 705 (But any available number)
Transformation (add two):
FlowType: Direct
Target Attribute: EmployeeOrgDataCostCenter
Source: EmployeeOrgDataCostCenter
Merge type: Update
FlowType: Direct
Target Attribute: EmployeeOrgDataDivision
Source: EmployeeOrgDataDivision
Merge type: Update

Now that all our rules have been saved and we have closed the Synchronization Rules Editor, we can then enable the sync scheduler again like this:
Set-ADSyncScheduler -SyncCycleEnabled $trueAnd then this to make sure it’s started:
Get-ADSyncScheduler | select-object SyncCycleEnabledThe output from this should be True.
Setting the values of the mapped attributes in Active Directory
Now that we have set up the sync of the attributes, we need to populate them in Active Directory with values so that we can work with them in Entra ID. The format that the date values need to be in is this: yyyyMMddHHmmss.fZ
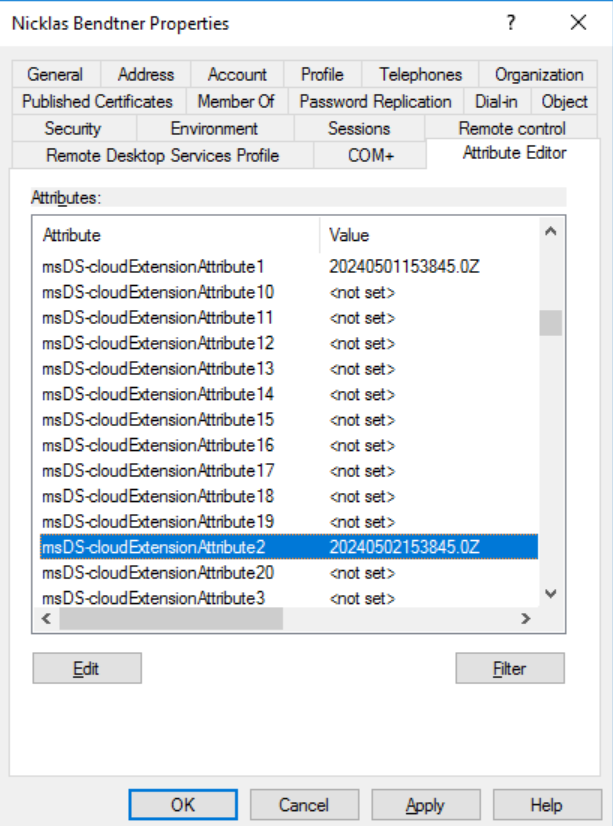
So, by adding the date 20240501153845.0Z to msDS-cloudExtensionAttribute1:
I should then be able to see Employee hire date be like this in Entra ID on my user: May 1, 2024, 3:38 PM
(After the sync has run on Microsoft Entra ID Connect sync)

And by adding 20240502153845.0Z to the same users msDS-cloudExtensionAttribute2 I will get the leave date set on the user in Entra ID, however, EmployeeLeaveDateTime is not visible in Entra ID on the users properties.
The only way to read the EmployeeLeaveDateTime value is by using the Microsoft Graph:
You need User.ReadAll and User-LifeCycleInfo.Read.All permissions.
User-LifeCycleInfo.Read.Al is needed to read EmployeeLeaveDateTime. User.ReadAll is needed two read EmployeeHireDate and EmployeeOrgData.
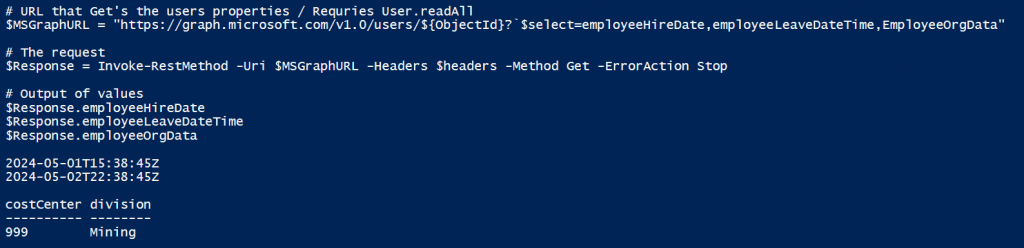
If you prefer to use the Microsoft Graph PowerShell module then you use this PowerShell code:
If you want to set msDS-cloudExtensionAttribute1 or msDS-cloudExtensionAttribute2 in Active Directory using PowerShell, you can use this PowerShell code to format the date correct for the attributes.
$Date = Get-date
$Date.ToString("yyyyMMddHHmmss.fZ")
The EmployeeOrgdata can be viewed as well on a user’s properties tab in Entra ID as long as you have added values to msDS-cloudExtensionAttribute3 and division in Active Directory:

Now we have succesfulde set up EmployeeHireDate and EmployeeLeaveDateTime so we can use those attributes run onboarding and offboarding Lifecycle Workflows in Microsoft Entra ID governance among other tings. (EmployeeHireDate can be used in Dynamic Security groups for example)